目的
在上一篇『Jenkins:安裝 Jenkins 在 Kubernetes』將 Jenkins 安裝在 Kubernetes 後,現在來試試看搭配 GitHub 去使用 Multibranch Pipelines 自動化管理 Pipeline Jobs。
Dynamic Agents
透過 Helm Chart 安裝 Jenkins 時,預設會安裝 Kubernetes Plugin,可以在 Kubernetes Cluster 內動態的為 Jenkins agents 建立 Pod 而不用手動去建立 static agents。
事前準備
架構連線的方式為 GitHub App 在發生 events 時會送請求到 Jenkins Webhook,由於我的 Kubernetes Cluster 是在我的 Lab 環境,且沒有固定的外部 IP Addresses 或 Domain Names,這邊我使用 Hookdeck 的 CLI 工具將來自 GitHub App 的 events 轉送往我 Kubernetes Lab 環境為 Jenkins 建立的 External IP。
在申請完 Hookdeck 帳號後,網站會引導你建立第一個 Connection,需要填的資訊約如下:
👉 Event Source
- Source Type:
GitHub - Source Name:自訂
- Webhook Signing Secret:自訂
Webhook Signing Secret為用來驗證 Requests 是來自 GitHub App 的,所以此 Secret 需要設定在三個地方GitHub App、Hookdeck、Jenkins,這邊我使用以下指令產生 secret:openssl rand -hex 32
👉 Send requests to Hookdeck
這部份可複製 Hookdeck 為你產生的 URL
👉 Define your event destination
- Destination Type:
CLI - Destination Name:自訂
- CLI Path:
/github-webhook/- 為
GitHub Branch SourcePlugin 使用的 URL Path
- 為
👉 Install the Hookdeck CLI
安裝好 CLI 工具並登入後,使用以下指令建立 CLI connection,之後送往 Hookdeck URL 的 events 都會轉發到你的 Jenkins URL:
# ./hookdeck listen {Your Jenkins URL} github
# 我的 Jenkins IP 為 172.18.8.202
./hookdeck listen http://172.18.8.202 github
建立 GitHub App
可參考官網附上的影片 How to Create a GitHub Branch Source Multibranch Pipeline in Jenkins。
- GitHub 點選右上角頭像,從下拉選單按
Settings - 左側欄點選
Developer settings - 點選
New GitHub App,之後輸入以下資訊- GitHub App name:
自訂 - Homepage URL:可自訂,主要用來介紹這個 App
- Webhook URL:貼上從 Hookdeck 複製來的 URL
- Webhook secret:貼上和 Hookdeck 設定一樣的 secret
- Repository permissions:
- Administration:
Read-only - Checks:
Read and write - Commit statuses:
Read and write - Contents:
Read-only - Metadata:
Read-only - Pull requests:
Read-only
- Administration:
- Subscribe to events:
- Check run
- Check suite
- Pull request
- Push
- Repository
- GitHub App name:
- 建立 GitHub App 成功後,在 General 頁面到 Private Keys 的部份去產生 private key 並下載
- 但下載的 private key 是
PKCS#1 RSAPrivateKey格式,Jenkins 的 Credential 必須使用 PKCS#8 格式,可透過以下指令轉換
openssl pkcs8 -topk8 -nocrypt -in downloaded-private-key.pem -out private-key-pk8.pem - 但下載的 private key 是
- 最後將 GitHub App 安裝到某帳號的 repositories,左側欄點選
Install App> 點選自己的帳號,可選擇要全部 repositories 或選定特定的- 例如我這邊選擇這個 repo:multipbranch-sample-app
設定 Jenkins
- 在設定之前需要確認安裝了 GitHub Branch Source Plugin
- 設定
Webhook Signing Secret,用來驗證請求來源是來自 GitHub App- 於 Jenkins 點選
Manage Jenkins>Credentials - Domains
global>Add credentials- Kind:
Secret text - Secret:貼上和 Hookdeck 設定一樣的 secret
- ID:自訂,例如
github-webhook-secret
- Kind:
- 於 Jenkins 點選
Manage Jenkins>System - 滑動到
GitHub的部份,點選Advanced,再點選Add shared secret - Shared secret 選擇剛剛建立的 Credential(Secret text)
- 於 Jenkins 點選
- 設定
Private Key,確認 Jenkins 能正常連線使用 GitHub App- 於 Jenkins 點選
Manage Jenkins>Credentials - Domains
global>Add credentials- Kind:
GitHub App - ID:自訂,例如
github-private-key - App ID:從 GitHub App 複製
- Key:貼上剛剛轉檔過後的 PKCS#8 private key
- Kind:
- 可以點選
Text Connection測試
- 於 Jenkins 點選
- 開始建立 Multibranch Pipeline
- 到 Jenkins 首頁,點選
New Item - Enter an item name:自訂,例如
multibranch-sample-app - 選擇
Multibranch Pipeline - Branch Sources:
GitHub - Credentials:選擇剛剛建立的 private key
github-private-key - Repository HTTPS URL:GitHub repository url,例如
https://github.com/WCYa/multibranch-sample-app.git
- 到 Jenkins 首頁,點選
產生 Jobs 和 Builds
如果 GitHub repo 的 root 目錄沒有檔案 Jenkinsfile,此時 Jenkins Multibranch Pipeline 就還會是空的。
我們先從 GitHub branch main 建立檔案 Jenkinsfile,以下為從 kubernetes-plugin
/examples 複製來的 Declarative Pipeline Script:
// Uses Declarative syntax to run commands inside a container.
pipeline {
    agent {
        kubernetes {
            // Rather than inline YAML, in a multibranch Pipeline you could use: yamlFile 'jenkins-pod.yaml'
            // Or, to avoid YAML:
            // containerTemplate {
            //     name 'shell'
            //     image 'ubuntu'
            //     command 'sleep'
            //     args 'infinity'
            // }
            yaml '''
apiVersion: v1
kind: Pod
spec:
  containers:
  - name: shell
    image: ubuntu
    command:
    - sleep
    args:
    - infinity
    securityContext:
      # ubuntu runs as root by default, it is recommended or even mandatory in some environments (such as pod security admission "restricted") to run as a non-root user.
      runAsUser: 1000
'''
            // Can also wrap individual steps:
            // container('shell') {
            //     sh 'hostname'
            // }
            defaultContainer 'shell'
            retries 2
        }
    }
    stages {
        stage('Main') {
            steps {
                sh 'hostname'
            }
        }
    }
}
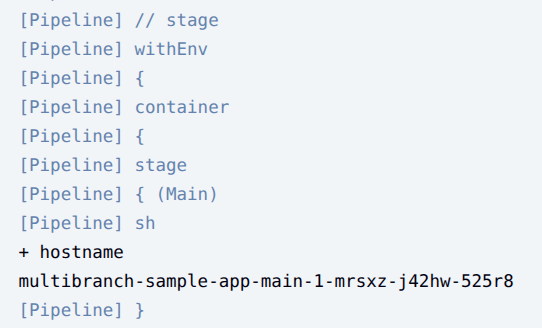
Push commit 到 branch main 後,GitHub App 就會發 Request 到 Jenkins Webhook,Jenkins 就會建立對應 branch main 的 job 並依照 Jenkinsfile 運行 build,可以從 Console Output 看到目前運行的資訊:
也可以從資訊看到,Jenkins Dynamic Agents 建立的 Pod 都會插入一個預設的 container 叫 jnlp,是 agents 用來向 Jenkins Controller 溝通使用,包含了一些敏感資訊:
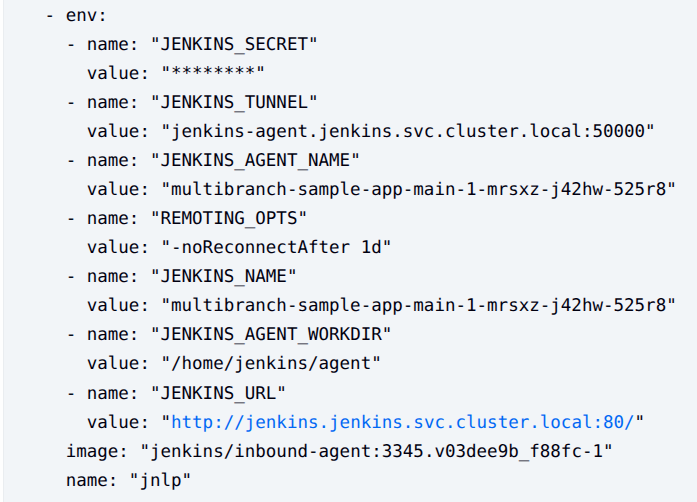
所以不建議在 jnlp container 去運行 build,要如上述 example 一樣另外建立名稱為 shell 的 container 去運行 build,Kubernetes 在 manifest 內為 container 設定的環境變數,與同個 Pod 內的其他 container 的環境變數是相互隔離的。
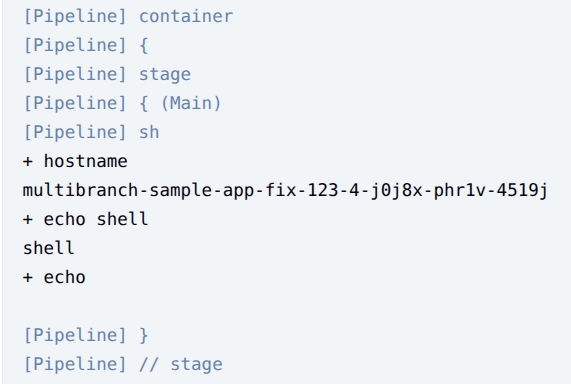
讓我們另外建立一個 branch fix-123 並調整 Jenkinsfile 去撈取 jnlp container 的環境變數試試看:
// Uses Declarative syntax to run commands inside a container.
pipeline {
    agent {
        kubernetes {
            // Rather than inline YAML, in a multibranch Pipeline you could use: yamlFile 'jenkins-pod.yaml'
            // Or, to avoid YAML:
            // containerTemplate {
            //     name 'shell'
            //     image 'ubuntu'
            //     command 'sleep'
            //     args 'infinity'
            // }
            yaml '''
apiVersion: v1
kind: Pod
spec:
  containers:
  - name: shell
    image: ubuntu
    command:
    - sleep
    args:
    - infinity
    env:
      - name: "CONTAINER"
        value: "shell"
    securityContext:
      # ubuntu runs as root by default, it is recommended or even mandatory in some environments (such as pod security admission "restricted") to run as a non-root user.
      runAsUser: 1000
'''
            // Can also wrap individual steps:
            // container('shell') {
            //     sh 'hostname'
            // }
            defaultContainer 'shell'
            retries 2
        }
    }
    stages {
        stage('Main') {
            steps {
                sh '''
                    hostname
                    echo "$CONTAINER"
                    # try to get JENKINS_SECRET env
                    echo "$JENKINS_SECRET"
                '''
            }
        }
        stage('for the fix branch') {
            when {
                branch "fix-*"
            }
            steps {
                sh '''
                    cat README.md
                '''
            }
        }
        stage('for the PR') {
            when {
                branch "PR-*"
            }
            steps {
                echo 'this only runs for the PRs'
            }
        }
    }
}
Push commit 到 GitHub 後,Jenkins 建立對應的 job fix-123 並運行 build,查看 Console Output 資訊可以發現在 shell container 是無法取得 jnlp container 的環境變數的: